
Setup
- Turn the LED lights on using the remote.
- Carefully plug the Firewire cable into the back of the camera and turn the camera on. Remove lens cap.
- On computer: Open Capture One software and the Schneider shutter control.
- Confirm Zig-Align of camera.
- Attach small circular mirror to camera body using double sided tape, making sure the mirror points towards the board.
- Place large mirror on center of vacuum table turning vacuums on to 90.
- Look through small hole in circular mirror and adjust camera mount knobs to create an infinite effect in the mirrors.
- Take the mirrors down, discard tape, and turn vacuums down to 60.
- Shutter Control: Click Select Lens and Click Ext. Release.
- Any time a change is made in the shutter control software, be sure to wait until Ext. Release turns a darker shade.
- Create a New Session in Capture One, or create a New Catalog if working with a large project.
- If returning to a project from a previous day, simply move all of the previous captures to the selects folder and reset adjustments.
- All images for a project should be kept in one session or catalog.
- Go to Capture tool in Capture One (shaped like a small camera), change Curve under Base Characteristics to Linear Response, place an object on the board, and click Capture.
- Confirm focus by capturing an image and make minute adjustments to lens bezel in order to achieve desired focus. Try not to focus directly in the center of the capture area, but midway between a corner and the center. This may take a few tries.
- Place the grey board(s) in the target area and capture an image. Before creating the LCC, check the overall luminance of the image. This can be done looking at the back of the camera and seeing the red highlights. Try to feather the lights slightly to resolve over/under exposed areas. Don’t spend too much time getting the lights perfect. Once they’re good enough, click Create LCC. This will create a uniform luminance across the area.
- Place large Golden Thread target on center of board with vacuums on. Handle the target carefully and do not get any of the colors dirty. Capture an image of the target.
- Click the eye dropper tool and click on color patch 13. Then click the “Set” button next to the eye dropper tool. This applies the white balance using the most neutral gray on the target.
- Use the Hand Tool (keyboard shortcut: H) to hover over color patch 15. The desire gray level for patch 15 is 149.
- Using the exposure tool in CaptureOne, you can fine tune the number if you’re just within a few digits of 149 but do not adjust by more than 0.2 stops.
- If greater correction for the exposure is needed you can do the following:
- Adjust shutter speed (bottom row of shutter control) up to increase brightness, or down to decrease brightness.
- Adjust aperture by 10ths (upper row of shutter control). Increasing makes the image darker.
- Delete all test images excluding the LCC and color target image. Rename these two images with the day’s date and their names.
- Create naming scheme in software for project. Based on the project, manual renaming may be necessary. It is the role of the camera operator to make sure the naming stays true.
Capturing
- Once setup is finished, place first object on center of board and click capture.
- Always capture the first image with the color target in the picture. If it’s possible, capture all images with a color target.
- Capture all of your images, ensuring that you do not accidentally click Ctrl+L or any other button except Capture or Ctrl+K (the keyboard shortcut for capture).
Output/Recipe
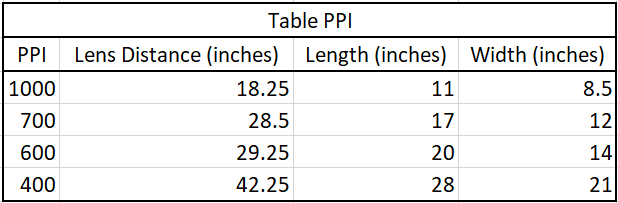
- Under Process Recipes, make sure TIFF 8bit Full Size is selected. Set the ppi output based on what you were shooting at. Some projects will require 16bit TIFF.
- Select all images via Ctrl+A and then Ctrl+Click any images not to be included. Always include color target taken after LCC was applied. Then under Process Summary click Process. This may take some time.
- Upload TIFFs to Working and copy the Session folder to the Masters if the entire project is complete. We will use the RAW IIQ files as Master files until quality control is completed.
- If finished for the day, put lens cap back on, turn camera off, unplug the cable from the back of the camera, and turn off lights.