Preparing the Image for Scan
- Open Cover.
- Place image face down with the corner of the document/image lined up with the icon that appears to be Kodak’s version of a person.
- Close the Cover.
- Before starting any scan, be sure the status light on the scanner is solid green and that the scanner is plugged into a Firewire port on the computer.
- Click the oXYgen Scan icon on the dashboard.
- Check for the proper settings below when scanning a Tranparency, a Damaged Transparency, and a Reflective Positive.
- A Setup Dialog box will appear along with a representation of the scanner bed.
- Under the Setup Dialog choose which options apply to your image:
- Type:
- Reflective
- Regular- for reflectives with a smooth surface
- Pasteup- for reflectives that have something pasted on them such as a label
- Transparent
- Regular- for masked or direct mounted originals
- Framed- for framed originals
- Mixed- for mixed mask
- Reflective
- Mode-these are the color settings for your image
- Color CMYK (Cyan, Magenta, Yellow, Black)
- Color RGB (Red, Green, Blue) 8 bit
- Color RGB 16 bit
- B&W (Black & White) 8 bit- for blacks, grays, and white
- B&W 16 bit
- Line-Art-for black and white pixels only
- DT File- contains raw data. Un-toned which make them appear dark with low contrast and may be difficult to view for retouching purposes.
- Format: Size of Image
- Best option is to observe where your image lies on the scanner bed and move the gray box with the green outline in the layout display box. Once you have made your settings, click on the set button at the bottom. Or you can save the parameters if you are scanning multiple images that are all the same size. Once this is done you may simply go back to the format drop down box and select the name of the format you have set for your scans.
- Additional Settings
- To mirror your image, which is only available before previewing your scan, simply check the mirror box.
- Type:
Preview Scan
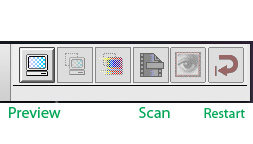
- Once all your settings have been selected, double check to make sure they are correct. Then click the Preview icon, on the windows palette, to scan the image for pre-high quality scan editing.
- The lamp may have to warm up; this may take a few minutes. The iQsmart3 will then pre-scan the image.
- The image is then displayed on the screen that you are probably sitting in front of right now. If you have multiple images on the bed please continue with the following instructions. If not then refer to the section titled “Can I Please Scan and Save this Image Already”. If your image needs some work such as cropping and multi-cropping the following instructions can hook you up.
- Crop and Multi-Crop
- By using the cropping tool in the Image Display Window (by the way, all the window names are located on page 29 of the oXYgen Scanning Application book) you can select several different areas of the image you would like to have as separate images. Simply crop one, click the crop tool again, and crop the rest. From the edit menu you can delete a crop you made.
- If you like the crop you made for one selection and think it is worthy of being used to define the rest of your future crops simply hit the command key and D at the same time to make the same crop and you can then move it over the next area to be cropped.
- To make sure your cropped images are correct and need no editing by themselves, hit the option key and the Prescan button located on the windows palette in Figure 8-a. This will send all your crops to the Preview Browser where you can edit them individually for final scanning. To call up the images individually simply double click on them in the Preview Browser.
- For more details on the preview scanning portion of your work, refer to pages 66-74 of the oXYgen Scanning Application book.
Can I Please Scan and Save this Image Already
- To Scan, click the Scan icon on the Windows Palette. If you have multiple images and have defined each individual images crops, hold down the control button while clicking on Scan.
- You will then be prompted to name your wonderful scan and where to locate it. Also define the file format (for more information on the file formats refer to page 78) you wish to save it as. Once you have done so, click the Scan button. All masters should be saved as TIFF files.
- The image will not appear, but rather sit in the folder you have chosen to save it in.
Batch Scanning Instructions
- Select correct template
- Preview all images.
- A queue and film strip should appear; gradually, each image will populate the film strip.
- Double-click onto an individual image in the film strip. These images will have names like “Preview 1,” “Preview 2” and so on.
- Adjust crop tool to include as much image as you like (when scanning photos/film, make certain to leave around 1/8-inch around the edge).
- Click “Save”
- Select file name.
- Select all preview images in film strip to scan.
- Go to “Scan”; select “All Crops.” A film strip icon will appear in thumbnail ‘film strip” to indicate scanning has begun.
Examples of Layout Display; Icons; and Settings for Reflective, Undamaged and Damaged Negatives
Layout Display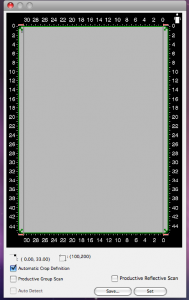
|
Preview, Scan, and Restart icons
|
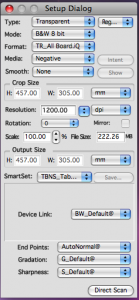
Settings for reflective scans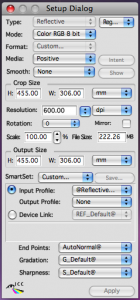 |
Settings for undamaged negative scans
|
Settings for damaged negative scans 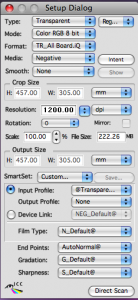 |