Physical to Digital Settings
- Documents with only typed-text, scan as JPEG and save as PDF/A.
- Hand-written documents or documents containing images, scan as RAW and save as TIFF in post. Turn off auto-crop when capturing in RAW.
Camera Settings
- Use Canon software to adjust camera distance with the Live Preview function. Move the cameras up or down the Bookscanner arms to have no more than an inch of extra space around the book. The book should be positioned in the middle of the frame. Make sure Canon software is closed before using BookDrive Pro, otherwise you will not be able to control the cameras.
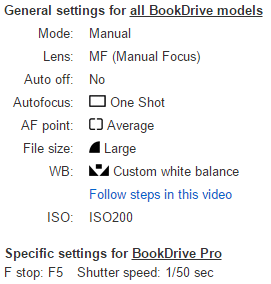
- Confirm these are the cameras’ settings (we capture in ISO 320) when first opening BookDrive software. The left camera should have its shutter speed set to 1/40. Depending on what you are capturing, the file size should be set to either RAW or Large.
- Custom white balance should already be set. Confirm the Custom white balance icon is shown on each cameras’ settings in the capture software.
- Automatic vs Manual Focus – It may seem easier to use automatic focus, but depending on the page content, you could end up with blurry pages and needing to re-capture images. It is best to stick with manual focus. To set this up place a piece of paper with writing on it over the page, take a test capture (+ symbol on numpad), and then flip the lens switch to manual focus. This focus will be good for at least 50 pages.
Troubleshooting
- If you cannot adjust camera settings, take a test capture and see if that works.
- If the software crashes when capturing an image, switch the cameras off and turn them back on. The power switch should be pointed to “On”, which is the middle of the three options on the back of the camera.
- Before contacting your supervisor about the cameras, or software not working: close software, shut off cameras, and reboot computer. This solves 90% of problems.
- Note: We will no longer be using the laser auto focus because it is not compatible with Windows 10.
