Standard Photoshop workflow
- Crop – Press C
- Rotate/Deskew
- Invert – Press Ctrl+i
- Image Size – Press Ctrl+Alt+i
- Color Profile
- Levels – Press Ctrl+L
- Blue Tint
- Red Tint
- Removing Moire
Crop
- Press “C” or select the crop tool.
- Select the image leaving just a tiny amount of room around the borders, unless otherwise instructed.
- You can also rotate the image using the crop tool and then make the crop selection.
- Press Enter.
Below is a video of how to create an AutoCrop and Color profile action. Ask your supervisor before performing an autocrop on your images as there may be different crop requirements for certain projects. This autocrop is not 100% accurate, therefore it is paramount to double check the results. You will have to rename the file results to remove the word “copy”. Renaming using XnView can be found on the instructions page. This action will not deskew images, they must already be rotated appropriately.
- Create action
- Open any TIFF image in Photoshop. Click Create New Action on the Actions Window and give it a relevant name.
- The action should automatically start recording.
- Click File -> Automate -> Crop and Straighten Photos
- Click Edit -> Assign Profile -> Adobe RBG 1998
- Click File -> Save. Save in a different folder from original
- Close the image and close the original image (Photoshop opens the original, then makes a copy of it to crop)
- Click Stop on the Actions Window
- Go back and delete the image you just saved in case you plan on running a batch with that image in it
- Prepare for batch
- Click File -> Automate -> Batch
- If you just created the action, it should automatically be selected. If not, under Play Set, choose your batch action
- Choose the source folder with the original images
- Under Destination, choose Save and Close. Otherwise the batch will keep multiple images open after it finishes or until it runs out of video memory to keep all the tabs open.
- Let it run and then compare the original to the cropped set to make sure nothing was cropped out.
Rotate / Deskew
- Go to Image, Image Rotation, and select which way to orient the image.
- Or, use the crop tool as listed in the Crop section.
- Or, select the entire image using Ctrl/Command+A and then press Ctrl/Command+T. This allows you to rotate the image at any angle freehand. Press Enter when finished.
- If the image is a negative or slide, it was scanned emulsion side down, therefore requiring it to be flipped horizontally on its axis for right-reading. Go to Image, Image Rotation, Flip Canvas Horizontal. Ideal to set custom keyboard shortcut to Ctrl+F.
Invert
- Typically negatives are scanned without the scanner software creating a positive image. This way we have the master file representing the true look of the negative. To make the negative a positive, go to Image, Adjustments, and Invert (shortcut key Ctrl/Command+I).
- Black and white images scanned in color due to damage should be converted to black and white in Photoshop.
Image Size
- Negatives, slides, and aerials are scanned to a certain ppi in order to replicate the actual print size.
- Negatives under 20sq inches and 35mm slides should be re-sized to 4000 pixels on the long side. Go to Image, Image Size, and change the largest number to 4000.
- Negatives 20sq inches and over should be re-sized to 6000 pixels on the long side. Go to Image, Image Size, and change the largest number to 6000.
- Aerials under 35sq inches should be re-sized to 8000 pixels on the long side. This does not apply to oversize aerials.
- Aerials 35sq inches and over should be re-sized to 10000 pixels on the long side. This does not apply to oversize aerials.
Color Profile
- All working tiff, color images should have the color profile “Adobe RGB 1998”. Go to Edit, Assign Profile, Select the third radio button and choose Adobe RGB 1998 from the drop down menu.
- JPEGs provided for access should have the color profile “rRGB”.
Levels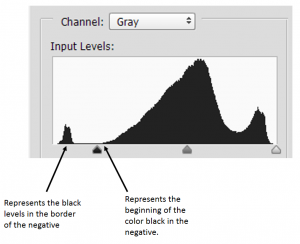

- Level adjustments may be necessary for black and white negatives. When scanning, we turn off color correction for most materials to capture the most accurate master file, which can make older negatives look washed out. This can occasionally apply to slides, as well. If level adjustments are needed, the lab supervisor will include them in task assignments.
- Go to Image, Adjustments, and Levels. There will be a histogram of the black, grey, and white levels of the image. If there isn’t a large black border around the negative after cropping and inverting, pull the black arrow towards the base of the histogram. Do the same for the white arrow. If there is a large black border, you will have one hump to drag the black arrow past.
Blue Tint
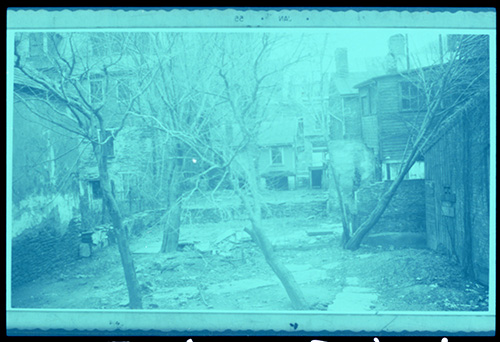
- Solution 1: Go to Image -> Auto Color
- Solution 2: Go to Image -> Adjustments -> Levels. Click on the white eye dropper tool in the new popup box and click on a portion of the image that should be white, then click OK. This works best when scanned with a color patch or black and white negatives.
- Solution 3:
- Add Color Profile first, Adobe RGB 1998
- Go to Image – Adjustments – Match Color
- Click Neutralize
- “If you find that the Color Match takes too much color out of your photograph, drag the Fade slider to the right until some color comes back. To increase the intensity of the color, drag the Color Intensity slider to the right. When you’re happy with how it looks click OK.” (-Jennifer Farley, Remove a color cast…)
Red Tint on Slides

There are several tutorials online to show how to fix this using Levels and Color Balance. For the lab, a Photoshop action has been provided. Contact lab supervisor or project manager if it is not in your list of actions in Photoshop.
Removing Moire – CaptureOne software
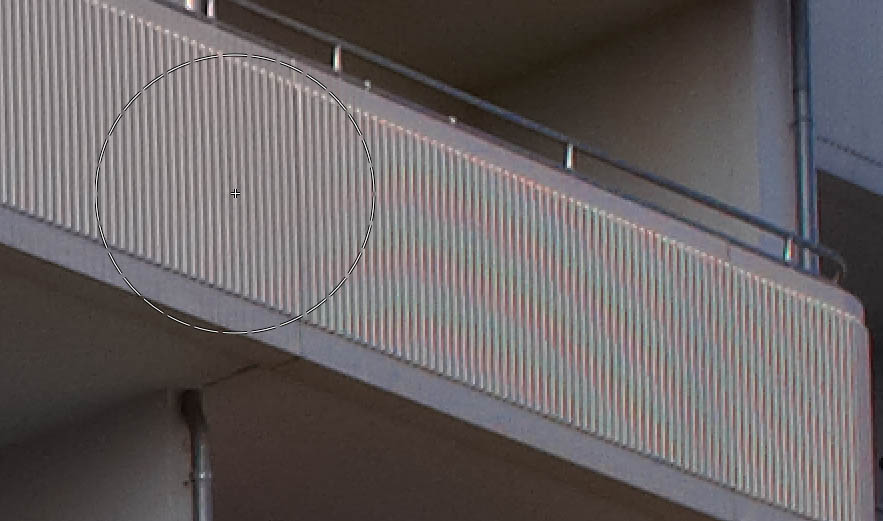
Moire is the rainbow effect on digital images which can occur on sharp images. Instructions below are from the developers of the CaptureOne software.
- Add a new Local Adjustments Layer
- Inverse the mask. This is only an intermediate state. By inverting the mask, we work on the whole image which is necessary when setting up the parameters for the Moiré Tool.
- Set the pattern size to maximum to make sure that the color moiré filter covers a whole period of false colors.
- Now drag the amount slider until the color moiré disappears. You should use as low a value as possible to remove the moiré.
- Reduce the pattern size to the minimum size that still fully removes the moiré. Now we have found the minimum values required to remove the moiré. This is important, as it will minimize the risk of unwanted color bleeding.
- We only want to use the values locally, so invert the mask again.
- Select a suitable bush size and brush away the color moiré.